Due to a lack that I noticed of truly “technical PPC posts” on different blogs and websites, I decided to share five of the optimization processes that I go through with AdWords accounts, which in the vast majority of cases lead to significant improvements in performance over time.
The following 5 processes that I’m going to present, all utilize certain reports that when analyzed correctly, will show you areas in need for optimization, and as a result improve your account’s performance.
1. Adding Search Terms
The way that I see it, Phrase/Broad/BMM keywords serve as “keyword finders”. They are a great way to pick up on keywords that convert for you.
Go to your “Keywords” tab, select “Search Terms”. Click “Customize Columns” and add conversions/converted clicks.
Select the largest viable date range (Since the day that the account has been able to track conversions. So if conversion tracking has been added from day 1, select “All time”).
Now filter out all the keywords that have 1 or more conversions and make sure that the report only displays search terms that are not already added to your campaign by using the Added / Excluded filter and selecting “None”
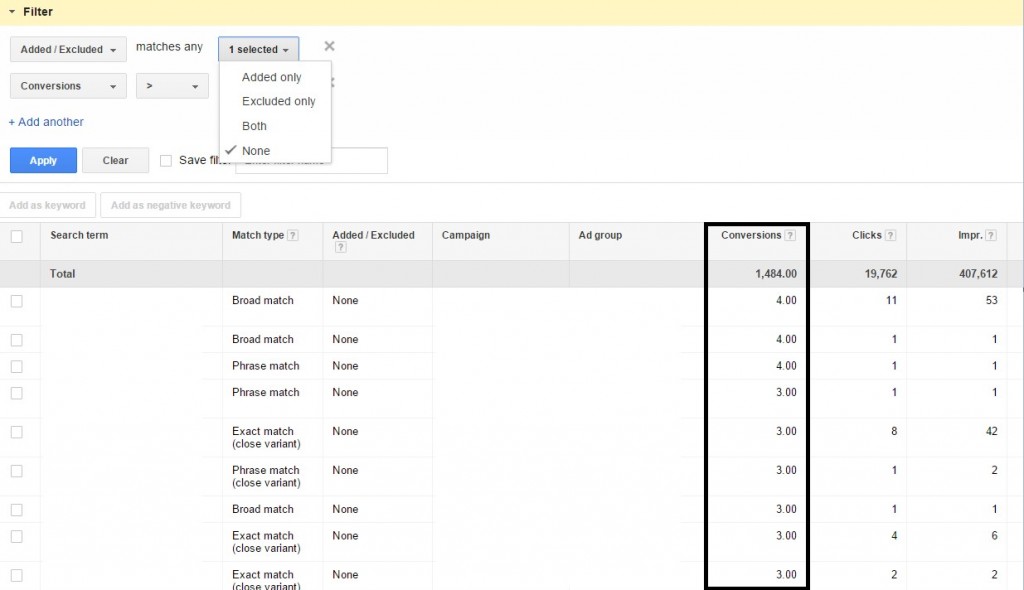
Then either manually add them as exacts to your campaign or download the report to Excel and bulk upload it.
If the CPA of the keyword that you’re adding was higher than your target CPA, give it a “safe” bid – a bid that based on your account’s performance, you know is likely to convert at a desired price. You can usually calculate it by finding out the average conversion rate of your keywords – let’s say it’s 5% and your target CPA is 50$. So 100/5 = 20 click on average needed for a conversion. Then 50$ (target CPA) divided by 20 (average clicks needed for a conversion) = 2.5$ as your max CPC.
If the CPA of the keyword you’re adding is your target CPA or less, just set the average CPC for that search term as your bid. I personally like doing it on an excel spreadsheet and then importing it to AdWords Editor because it’s much more efficient and also safer since you can review your work before uploading the changes.
2. Adding Negative Keywords
Here we will once again download a search term report by going to the Keywords tab > Search terms, add the conversion columns and select the largest viable date range.
Filter all the search terms that have 0 conversions, but don’t apply a filter for Added / Excluded because you’re going to want to see everything.
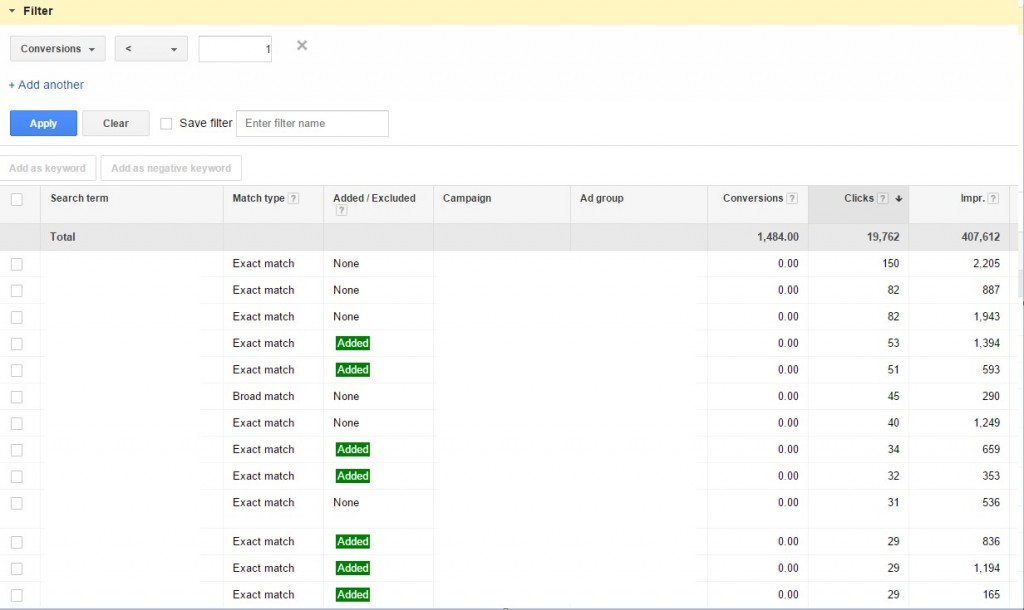
You’ll want to decide on certain rules that justify adding a search term as a negative which are based both on the cost of that search term, and the number of clicks it received.
For example, if a keyword has cost a very high amount of money but didn’t receive that many clicks then it might be a good idea to actually add it to your campaign in order to control your bid for it.
Depending on your budget and limitation, decide how many clicks and how much of a cost a search term must have to justify adding it as a negative.
For an account that’s limited by budget for example, you may want to add negative search terms that cost double or triple your average/desired CPA, and received double or triple the amount of clicks that on average leads to a conversion in your account.
Another insight that this report gives, is whether or not your phrase and broad keywords are triggering completely irrelevant search terms, which the exclusion of would be a no brainer.
For example, in one of the accounts that I managed recently, I noticed that one of the broad keywords was triggering search terms that had to do with Cheat Codes for the video game GTA 5, even though the keyword and service were about an online trading platform. In that case, excluding the keywords “GTA” and “Cheat codes” immediately helped save more than a few bucks.
3. Conversion optimizer
If you have a Display campaign that uses CPC bids that’s eligible for conversion optimizer, go ahead and duplicate the campaign. Leave the newly duplicated campaign as it is, and set the original campaign from CPC bids to CPA bids that are about half as high as your desired CPA. This will often get you an easy increase in cheap conversions.
In order for Conversion Optimizer (CPA bids) to be available for your campaign, it must have at least 15 conversions in the past 30 days. You will also see the following message under your campaign alerts:
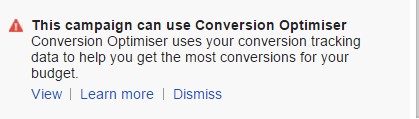
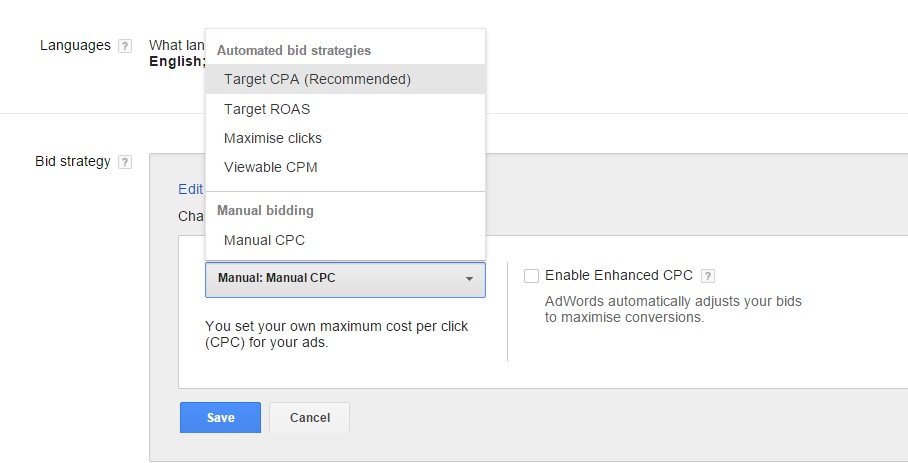
You can then go into the campaign’s settings > Bid Strategy. Select “Target CPA” and enter your default bid, you will then be able to set the target CPA bid for each ad group individually.
4. Separation
There are some elements of a campaign to which you can’t set bid adjustment and the only way to control their bid is place them in separate ad groups. For example, in some of the accounts I’ve managed, text ads performed better than image ads on the Display network. On others, Image ads performed better than text ads.
Supposing your Image ads perform better than your text ads within a certain campaign, instead of removing those text ads because their CPA is too high, you’re going to want to create separate ad groups for text and image ads, and bid low enough on the text ads ad group so that their CPA becomes acceptable, thus gaining overall more conversions.
This is the time to be creative and separate what matters to you. You can make as many separations as you like and not only on the ad group level, but also the campaign level.
Here are a few examples of separations you may want to consider:
- Geographical (campaign level)
- Language (campaign level)
- Targeting Optimization – aggressive/conservative/disabled (ad group level)
- Ad Type – image ads/text ads (ad group level)
5. Ad Schedule
Most accounts will convert better during certain hours and worse during others. You’re going to want to find out exactly which hours those are so that you can adjust your bids accordingly.
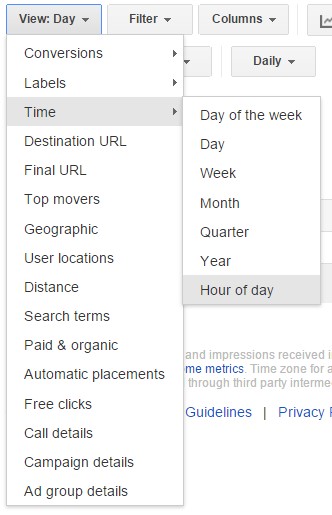
Start by going to the Dimensions tab, then View > Time > Hour of Day:
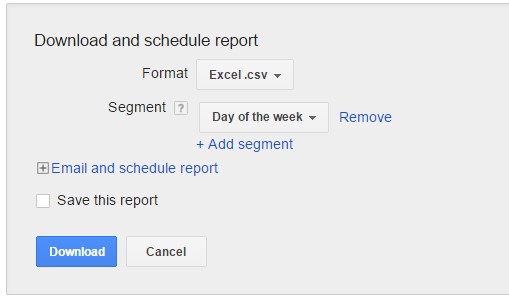
Select a large enough date range that will provide statistically significant data, make sure that your conversion columns are included and then download the report to excel after adding the “Day of the Week” segment:
Open up your excel report and delete the bottom row “Total”. Click a random cell within the report, and create a pivot table. Drag “Hour of Day” to the ROWS and “Clicks”, “Cost”, and “Conversions” to the Values
Create 2 more columns, a CPA column that will calculate the “Cost”/”Conversions” and a C/R (Conversion Rate) column that will calculate the “Conversions”/”Clicks”.
Sort the table by CPA from lowest to highest:
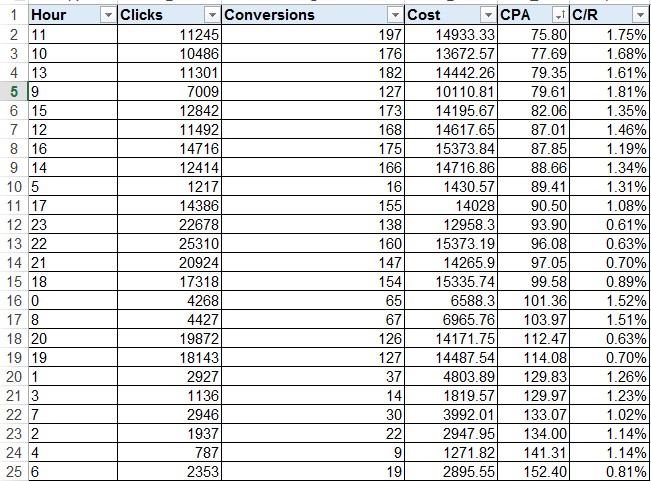
Usually you will see that the hours with the lower CPA are also the ones with the higher conversion rates. When you have an hour that has a high conversion rate paired with low CPA, that’s when you can be certain that it’s a good hour.
Find out the range of consecutive hours that converts with a CPA of about 10% less than your target CPA. Let’s say in the case of the above report that the target CPA is $100, I would increase the bids during the hours 9-17.
In this case I would also opt to decrease the bids of hours 1-4 and 6-7, but before we act upon this data, there’s another pivot table we’re going to want to analyze, and that’s the performance per day of week report.
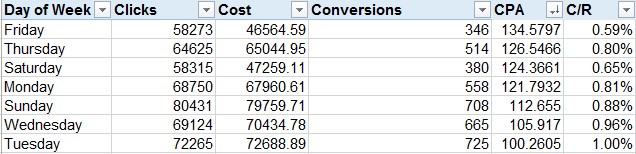
We will create the exact same pivot table as the hour of day one, but instead of dragging the hours to the ROWS, we will drag the days of week there instead.
Here’s what I got:
Since the difference between the CPA of the days is not nearly as massive as the difference between the hours in this case, you may want to leave specific day bid adjustments alone until you see the effect of your hourly bid adjustments.
Go back to AdWords > All Campaigns > Settings.
The process of setting bid adjustments for hour specific time ranges is a little complex and is made of 2 steps.
Step 1. Create the ad schedules – this step will require some concentration:
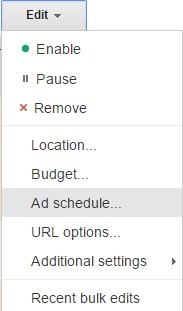
Select your campaigns, click Edit, then Ad Schedule:
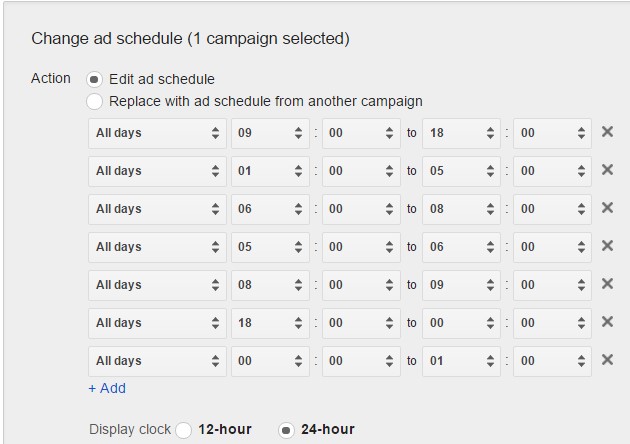
You’ll need to create a few different schedules:
A schedule for the range of hours you want to increase your bid
A schedule for the range of hours you want to decrease your bid
A schedule for all the other hours in between (if our schedule doesn’t cover 24/7, the campaign won’t run 24/7)
In our case, it will look like this:
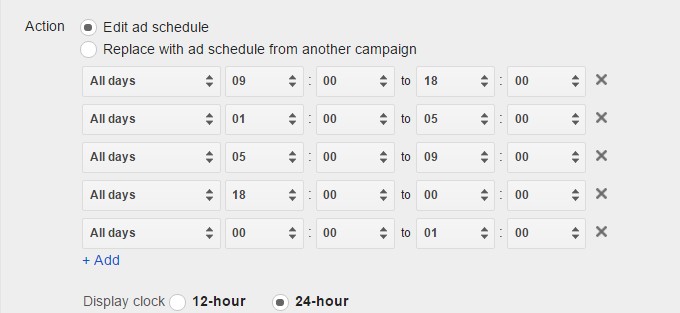
Alas you will not be able to apply this schedule because for some reason Google decided to limit the number of breakdowns you can create within a single day. In this case the best compromise we can make is to ignore the bid adjustment for the hours 6-7. So after removing these specific schedules, we end up with this:
Step 2: go to All Campaigns > Settings > Ad Schedule
And simply start editing your bid adjustment.
Summary
Managing AdWords campaigns is much more than just a marketing strategy. You also need an optimization strategy, and in order to do that, you must know the platform and all its features like the back of your hand.
In this posts I shared 5 optimization processes that personally work well for me, and I’d love to hear your thoughts, suggestions or questions in the comments below!
5 Proven Ways to Increase Your AdWords Account’s ROI 5.00/5 (100.00%) 6 votes
Related Posts


5 Proven Ways to Increase Your AdWords Account’s ROI
Due to a lack that I noticed of truly “technical PPC posts” on different blogs and websites, I decided to share five of the optimization processes that I go through with AdWords accounts, which in the vast majority of cases lead to significant improvements in performance over time.
The following 5 processes that I’m going to present, all utilize certain reports that when analyzed correctly, will show you areas in need for optimization, and as a result improve your account’s performance.
1. Adding Search Terms
The way that I see it, Phrase/Broad/BMM keywords serve as “keyword finders”. They are a great way to pick up on keywords that convert for you.
Go to your “Keywords” tab, select “Search Terms”. Click “Customize Columns” and add conversions/converted clicks.
Select the largest viable date range (Since the day that the account has been able to track conversions. So if conversion tracking has been added from day 1, select “All time”).
Now filter out all the keywords that have 1 or more conversions and make sure that the report only displays search terms that are not already added to your campaign by using the Added / Excluded filter and selecting “None”
Then either manually add them as exacts to your campaign or download the report to Excel and bulk upload it.
If the CPA of the keyword that you’re adding was higher than your target CPA, give it a “safe” bid – a bid that based on your account’s performance, you know is likely to convert at a desired price. You can usually calculate it by finding out the average conversion rate of your keywords – let’s say it’s 5% and your target CPA is 50$. So 100/5 = 20 click on average needed for a conversion. Then 50$ (target CPA) divided by 20 (average clicks needed for a conversion) = 2.5$ as your max CPC.
If the CPA of the keyword you’re adding is your target CPA or less, just set the average CPC for that search term as your bid. I personally like doing it on an excel spreadsheet and then importing it to AdWords Editor because it’s much more efficient and also safer since you can review your work before uploading the changes.
2. Adding Negative Keywords
Here we will once again download a search term report by going to the Keywords tab > Search terms, add the conversion columns and select the largest viable date range.
Filter all the search terms that have 0 conversions, but don’t apply a filter for Added / Excluded because you’re going to want to see everything.
You’ll want to decide on certain rules that justify adding a search term as a negative which are based both on the cost of that search term, and the number of clicks it received.
For example, if a keyword has cost a very high amount of money but didn’t receive that many clicks then it might be a good idea to actually add it to your campaign in order to control your bid for it.
Depending on your budget and limitation, decide how many clicks and how much of a cost a search term must have to justify adding it as a negative.
For an account that’s limited by budget for example, you may want to add negative search terms that cost double or triple your average/desired CPA, and received double or triple the amount of clicks that on average leads to a conversion in your account.
Another insight that this report gives, is whether or not your phrase and broad keywords are triggering completely irrelevant search terms, which the exclusion of would be a no brainer.
For example, in one of the accounts that I managed recently, I noticed that one of the broad keywords was triggering search terms that had to do with Cheat Codes for the video game GTA 5, even though the keyword and service were about an online trading platform. In that case, excluding the keywords “GTA” and “Cheat codes” immediately helped save more than a few bucks.
3. Conversion optimizer
If you have a Display campaign that uses CPC bids that’s eligible for conversion optimizer, go ahead and duplicate the campaign. Leave the newly duplicated campaign as it is, and set the original campaign from CPC bids to CPA bids that are about half as high as your desired CPA. This will often get you an easy increase in cheap conversions.
In order for Conversion Optimizer (CPA bids) to be available for your campaign, it must have at least 15 conversions in the past 30 days. You will also see the following message under your campaign alerts:
You can then go into the campaign’s settings > Bid Strategy. Select “Target CPA” and enter your default bid, you will then be able to set the target CPA bid for each ad group individually.
4. Separation
There are some elements of a campaign to which you can’t set bid adjustment and the only way to control their bid is place them in separate ad groups. For example, in some of the accounts I’ve managed, text ads performed better than image ads on the Display network. On others, Image ads performed better than text ads.
Supposing your Image ads perform better than your text ads within a certain campaign, instead of removing those text ads because their CPA is too high, you’re going to want to create separate ad groups for text and image ads, and bid low enough on the text ads ad group so that their CPA becomes acceptable, thus gaining overall more conversions.
This is the time to be creative and separate what matters to you. You can make as many separations as you like and not only on the ad group level, but also the campaign level.
Here are a few examples of separations you may want to consider:
5. Ad Schedule
Most accounts will convert better during certain hours and worse during others. You’re going to want to find out exactly which hours those are so that you can adjust your bids accordingly.
Start by going to the Dimensions tab, then View > Time > Hour of Day:
Select a large enough date range that will provide statistically significant data, make sure that your conversion columns are included and then download the report to excel after adding the “Day of the Week” segment:
Open up your excel report and delete the bottom row “Total”. Click a random cell within the report, and create a pivot table. Drag “Hour of Day” to the ROWS and “Clicks”, “Cost”, and “Conversions” to the Values
Create 2 more columns, a CPA column that will calculate the “Cost”/”Conversions” and a C/R (Conversion Rate) column that will calculate the “Conversions”/”Clicks”.
Sort the table by CPA from lowest to highest:
Usually you will see that the hours with the lower CPA are also the ones with the higher conversion rates. When you have an hour that has a high conversion rate paired with low CPA, that’s when you can be certain that it’s a good hour.
Find out the range of consecutive hours that converts with a CPA of about 10% less than your target CPA. Let’s say in the case of the above report that the target CPA is $100, I would increase the bids during the hours 9-17.
In this case I would also opt to decrease the bids of hours 1-4 and 6-7, but before we act upon this data, there’s another pivot table we’re going to want to analyze, and that’s the performance per day of week report.
We will create the exact same pivot table as the hour of day one, but instead of dragging the hours to the ROWS, we will drag the days of week there instead.
Here’s what I got:
Since the difference between the CPA of the days is not nearly as massive as the difference between the hours in this case, you may want to leave specific day bid adjustments alone until you see the effect of your hourly bid adjustments.
Go back to AdWords > All Campaigns > Settings.
The process of setting bid adjustments for hour specific time ranges is a little complex and is made of 2 steps.
Step 1. Create the ad schedules – this step will require some concentration:
Select your campaigns, click Edit, then Ad Schedule:
You’ll need to create a few different schedules:
A schedule for the range of hours you want to increase your bid
A schedule for the range of hours you want to decrease your bid
A schedule for all the other hours in between (if our schedule doesn’t cover 24/7, the campaign won’t run 24/7)
In our case, it will look like this:
Alas you will not be able to apply this schedule because for some reason Google decided to limit the number of breakdowns you can create within a single day. In this case the best compromise we can make is to ignore the bid adjustment for the hours 6-7. So after removing these specific schedules, we end up with this:
Step 2: go to All Campaigns > Settings > Ad Schedule
And simply start editing your bid adjustment.
Summary
Managing AdWords campaigns is much more than just a marketing strategy. You also need an optimization strategy, and in order to do that, you must know the platform and all its features like the back of your hand.
In this posts I shared 5 optimization processes that personally work well for me, and I’d love to hear your thoughts, suggestions or questions in the comments below!
Related Posts
Tags: